If you want cleaner, sharper lines, vector engraving is typically better because it uses precise paths that produce smooth, continuous edges. Raster engraving can create softer, pixelated lines, which may lower clarity, especially on detailed designs. The choice depends on your project and material — but understanding how each mode affects line quality helps you achieve professional results. Keep exploring to learn tips and techniques that can maximize your engraving clarity.
Key Takeaways
- Vector engraving produces continuous, smooth lines ideal for sharp, clean edges, making it generally cleaner than raster lines.
- Raster engraving fills areas with dots, which can result in blurry or pixelated lines, reducing overall line clarity.
- Proper design optimization and fine-tuning enhance line sharpness in both modes, but vector inherently offers higher crispness.
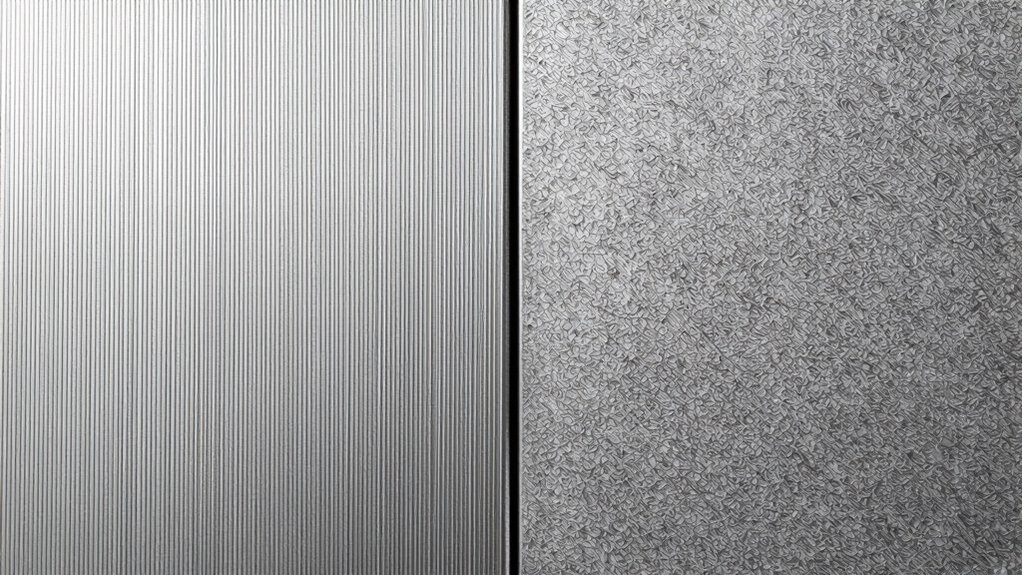
- Material surface texture impacts line clarity; smoother surfaces yield cleaner lines in both vector and raster modes.
- For the cleanest lines, vector mode is preferred for sharp edges, while raster is better for detailed images and shading.

ACMER S1 Laser Engraver, 6000mW Laser Engraver Machine Higher Accuracy Lazer Cutter and Engraving Machine with Working Area 130x130mm,0.04mm Laser Spot Engraving Machines & Tools
Fr*e AcmerTool Engraving Software Included: The engraver is fully optimized for AcmerTool, our self-developed engraving software, which is…
As an affiliate, we earn on qualifying purchases.
As an affiliate, we earn on qualifying purchases.
What Are Vector and Raster Engraving, and How Do They Differ?
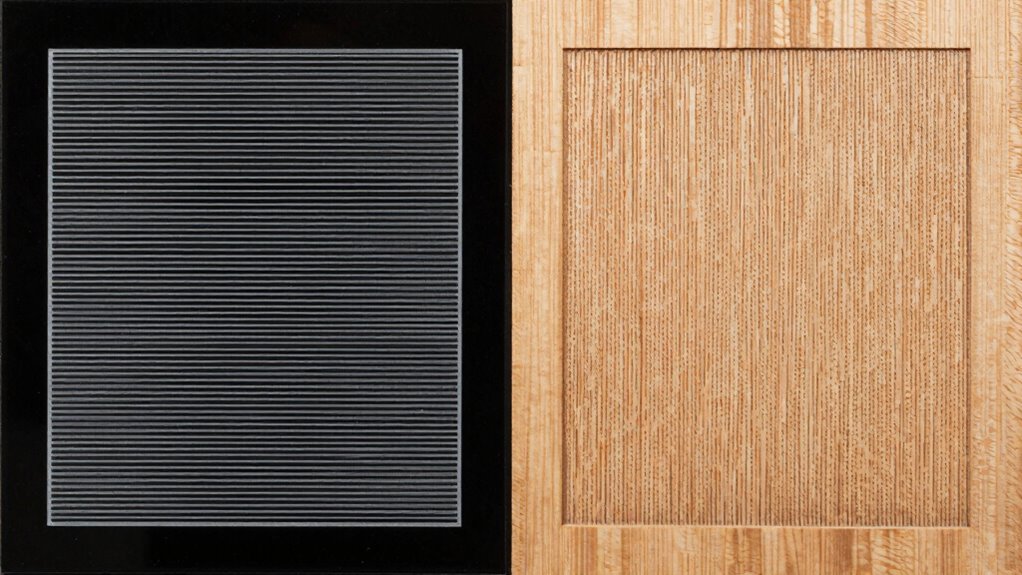
Vector and raster engraving are two common methods used to create detailed designs on various materials. With vector engraving, you use precise lines created by cutting along paths defined by mathematical equations. You control laser power and engraving speed to achieve sharp, clean lines. You can increase laser power for deeper cuts or slow down engraving speed for more detail. Raster engraving, on the other hand, involves scanning the laser across the surface, similar to printing. You adjust laser power and speed to control shading and intensity, affecting the overall quality. Faster speeds reduce exposure, while slower speeds increase detail. Understanding these differences helps you choose the right settings for your project, ensuring the best results based on the material and design complexity. Additionally, selecting the appropriate laser technology can enhance the precision and quality of your engraving.
laser engraving raster mode
As an affiliate, we earn on qualifying purchases.
As an affiliate, we earn on qualifying purchases.
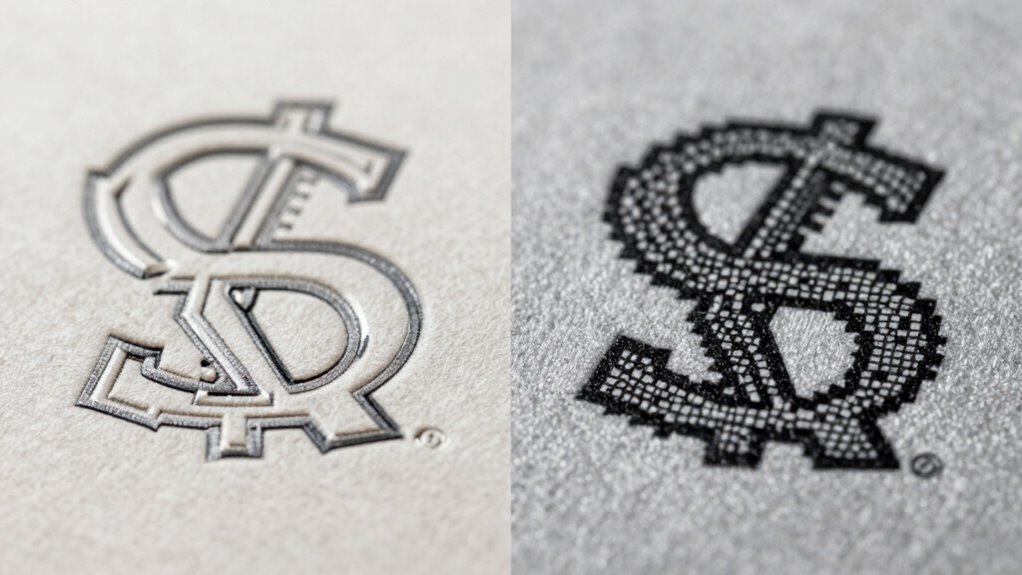
Does Vector or Raster Mode Create Sharper, Cleaner Lines?
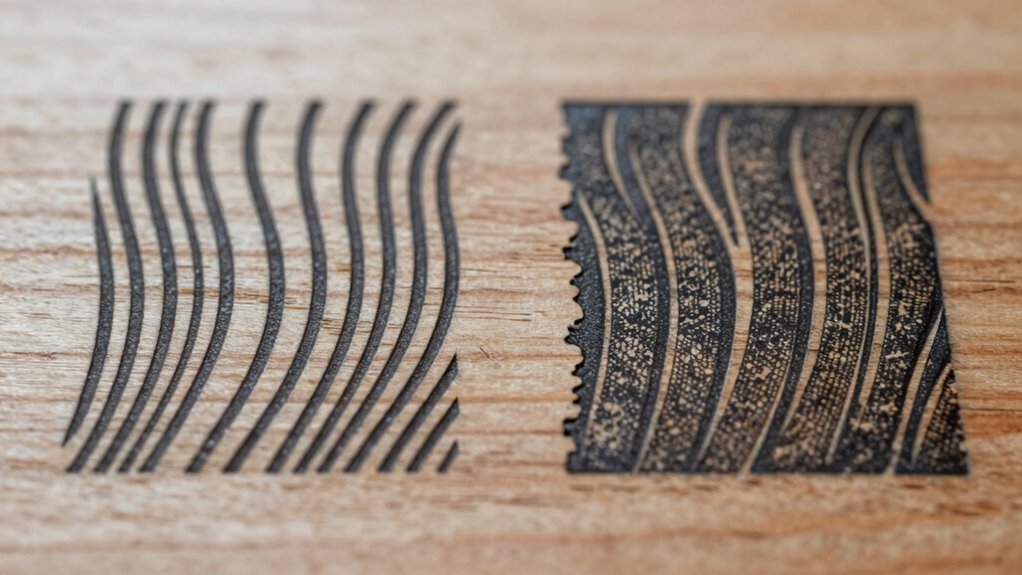
When it comes to creating sharp, clean lines in engraving, the mode you choose plays a significant role. Vector mode generally produces sharper, cleaner lines because it traces precise edges, maintaining high color contrast. Raster mode, however, fills areas with dots, which can soften lines and reduce sharpness, especially at lower engraving speeds.
| Mode | Line Sharpness | Impact on Color Contrast |
|---|---|---|
| Vector | Very sharp | Maintains high contrast |
| Raster | Slightly softer | Can lower contrast |
| Speed | Faster for vectors | Slower for detailed rasters |
Choosing vector mode with ideal engraving speed ensures crisp lines and vibrant contrast, making your work stand out.

Laser Engraving Machine for Beginners, Woxcker L2 Flex 5W Enclosure Pre-Assemble Laser Engraver 0.01mm High Precision for Coated Metal, Wood, Acrylic, Leather, Glass (Class 1 Output 5000mW)
Equipped with 360° Full Enclosure: Ensures maximum safety by blocking direct laser exposure, protecting eyes, and reducing risks….
As an affiliate, we earn on qualifying purchases.
As an affiliate, we earn on qualifying purchases.
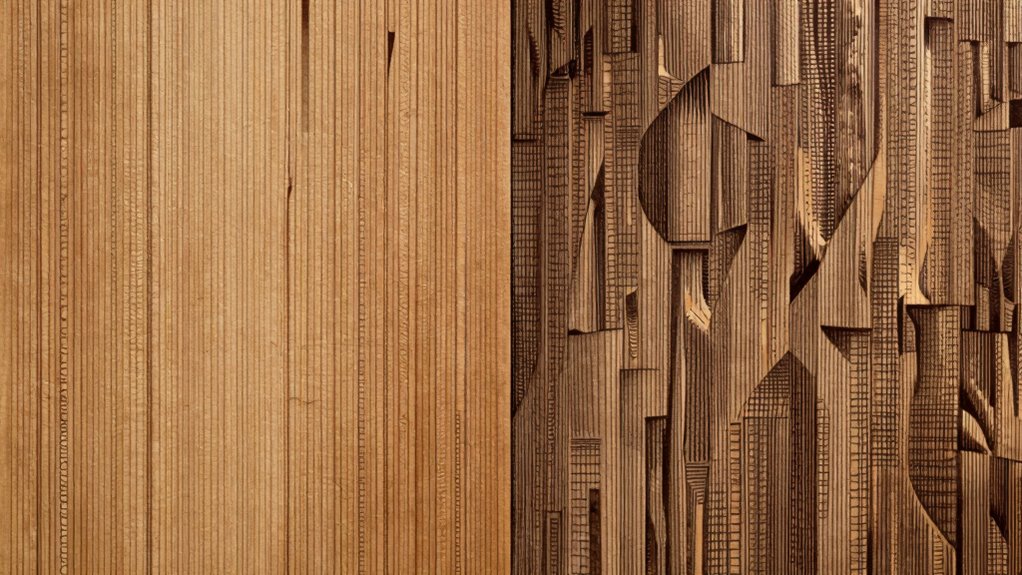
How Do Design Complexity and Material Choices Affect Line Sharpness?
Your design’s level of detail can impact how sharp and clear your lines appear, especially on different materials. Material textures can either smooth out or distort fine details, affecting line precision. Understanding these factors helps you choose the right approach to maintain crisp, clean engravings. Additionally, considering safe installation practices ensures that your equipment is set up correctly to achieve optimal results. Proper maintenance routines also play a crucial role in preserving engraving quality over time. Moreover, selecting the appropriate engraving settings can significantly influence the final line sharpness and overall clarity. When working with various materials, it’s important to account for their surface texture as it can affect the engraving outcome.
Design Detailing Level
The level of detail in your design and the choice of material considerably influence line sharpness during engraving. Complex designs with fine lines may challenge the engraving process, especially if the material isn’t compatible with certain engraving modes. For instance, highly detailed images often require precise software options that support intricate detailing without sacrificing line clarity. Raster engraving can handle complex shading but may produce softer lines if the detail exceeds the resolution limits. Vector engraving, on the other hand, excels with clean, sharp lines in simpler designs. When selecting materials, guarantee they match your software options and engraving mode capabilities. Balancing design complexity and material compatibility is key to achieving the sharp, clean lines you want in your finished piece.
Material Texture Influence
Material texture plays a crucial role in determining line sharpness during engraving, especially as design complexity increases. A rough or uneven material surface can cause inconsistencies in line edges, reducing overall clarity. When you adjust engraving depth, textured surfaces may lead to broader or irregular lines, diminishing detail sharpness. Smoother materials allow for cleaner, crisper lines because the laser or tool can follow the surface precisely. Conversely, highly textured surfaces challenge the engraving process, requiring careful calibration to maintain line accuracy. Material choices directly impact how well fine details are rendered; complex designs demand flatter, more uniform surfaces to achieve ideal line sharpness. Understanding your material’s texture helps you choose the right engraving parameters for cleaner, more precise results. Additionally, material properties such as hardness and reflectivity influence how effectively the engraving process produces sharp lines.
Line Precision Limits
Design complexity directly impacts the achievable line sharpness in engraving, especially when combined with material properties. Intricate designs can challenge the limits of your equipment, leading to less precise lines if the material isn’t compatible or if the engraving mode isn’t optimized. Harder materials often require more power or slower speeds, which can cause line blurring or uneven edges. Conversely, softer materials may result in fuzzy lines if not carefully controlled. Material compatibility influences how fine and clean your lines can be, affecting overall detail. Additionally, high design flexibility allows you to fine-tune settings for sharper results. Recognizing these factors helps you choose the right mode and settings to maximize line precision and achieve cleaner, more accurate engravings. Understanding material properties and design complexity is crucial for optimizing engraving quality.
LIGHTBURN USER GUIDE: A Complete Manual to Use this Software for Designing and Controlling Laser Machines with Ease
As an affiliate, we earn on qualifying purchases.
As an affiliate, we earn on qualifying purchases.
When Should You Use Vector or Raster Engraving for Best Results?
Choosing between vector and raster engraving depends on your project’s goals and the level of detail required. Use vector engraving when you need clean, sharp lines for logos, text, or simple designs, especially if color accuracy is important. It’s also more efficient, reducing machine maintenance since the process involves fewer passes. Raster engraving is better suited for detailed images, photographs, or shading effects where subtle gradations matter. Keep in mind that raster can generate more heat and wear on your machine, so it’s best for less frequent, detailed work. Additionally, understanding the contrast ratio of your projector can help you optimize your viewing environment for the best visual results. Selecting the right mode guarantees your final product looks professional and maintains your equipment’s longevity. Understanding these conditions helps you decide when each method gives the best results for your specific project.
Tips for Achieving Clearer Lines in Both Engraving Modes
To get clearer lines, start by optimizing your vector paths to reduce unnecessary complexity. Next, adjust your raster resolution to guarantee sharp, detailed engravings without losing clarity. Small tweaks in these areas can make a big difference in your final results.
Optimize Vector Paths
Optimizing vector paths is essential for achieving sharper, cleaner lines in both vector and raster engraving. Start by managing your color settings carefully, ensuring consistent color profiles to prevent unwanted line variations. Proper color management helps maintain precision across different design elements. Next, focus on toolpath optimization by simplifying complex curves and reducing unnecessary nodes. Use the shortest, most direct paths to minimize engraving time and improve line clarity. Avoid overlapping lines or redundant points that can cause blurry or uneven edges. Fine-tune your vector designs for smooth, continuous paths, which lead to cleaner engraving results. These steps help produce sharper, more precise lines, regardless of the engraving mode, giving you professional-looking finishes every time.
Adjust Raster Resolution
Adjusting the raster resolution directly impacts the clarity of your engraved lines in both vector and raster modes. Higher resolution settings create sharper detail, reducing pixelation and blurriness. To optimize your results, consider balancing resolution with engraving speed. Line smoothing can further enhance line quality by reducing jagged edges, making lines appear cleaner. Here’s a quick guide:
| Resolution Setting | Effect on Line Clarity | Best Use Case |
|---|---|---|
| Low | Blurry, pixelated | Quick, rough engravings |
| Medium | Acceptable detail | General projects |
| High | Sharp, detailed lines | Fine detail and crisp lines |
Adjust your resolution and enable line smoothing for the clearest lines, regardless of mode.
What Settings and Techniques Help Improve Line Quality?

Achieving sharp, clean lines in vector and raster engraving depends heavily on selecting the right settings and applying effective techniques. First, verify proper color management; accurate color profiles help match your design with the laser’s output, reducing inconsistencies. Next, calibrate your software regularly to maintain precise control over power, speed, and resolution, which directly impacts line quality. Use consistent engraving parameters for detailed work, and avoid overexposure that can cause blurring. When working with vector files, optimize line weights and node placement to prevent jagged edges. In raster engraving, adjusting the DPI and ensuring proper focus enhances line clarity. Additionally, understanding how smart home technology can aid in automating and monitoring your engraving setup can improve consistency and quality. Incorporating these tools can help you maintain optimal settings over time and respond quickly to any issues. Combining these settings with careful technique results in cleaner, sharper lines for both vector and raster projects.
Frequently Asked Questions
Can Software Limitations Affect Engraving Line Quality?
Software limitations can definitely affect your engraving line quality. If your software isn’t compatible with your engraver, it might cause issues like jagged lines or inconsistent depth. Additionally, poor engraver calibration can worsen line clarity, regardless of software. To guarantee clean lines, use compatible software and regularly calibrate your engraver. This improves precision and prevents errors that could compromise your engraving’s overall quality.
How Does Laser Power Influence Line Clarity?
Surprisingly, increasing laser power doesn’t always mean sharper lines. You need laser focus and beam consistency to truly enhance clarity. Too much power can cause the beam to scatter, blurring your design’s edges, like a watercolor paint spill. Instead, find that sweet spot where your laser’s focus is razor-sharp, and the beam remains steady. That’s when your lines become clean, crisp, and undeniably professional, even if it feels counterintuitive.
Are There Specific Materials Better Suited for Vector or Raster Engraving?
Certain materials are better suited for either vector or raster engraving based on material compatibility and desired engraving speed. For example, wood and acrylic work well for vector lines, offering precision and fast engraving. Conversely, materials like glass or metal often require raster engraving for detailed images, though it takes more time. You should choose your mode based on the material’s properties and the level of detail you want to achieve.
What Role Does Resolution Play in Line Sharpness?
You might think higher resolution always means sharper lines, but the resolution impact depends on your material and design. Increasing resolution enhances line sharpness by providing more detail, but beyond a point, it offers diminishing returns. For crisp, clean lines, choose a resolution that balances detail and processing time. Proper resolution guarantees your engraving accurately reflects your design, making lines look sharper and more professional without unnecessary complexity.
How Do Post-Processing Techniques Impact Final Line Quality?
Post-processing techniques substantially improve your final line quality by refining details and removing imperfections. Using compatible software guarantees seamless adjustments, while selecting the right material enhances the engraving’s sharpness. You can clean up edges, smooth out rough areas, and sharpen lines through techniques like polishing or applying filters. These steps help you achieve cleaner, more precise lines, making your engraving look professional and polished every time.
Conclusion
Choosing between vector and raster engraving is like selecting the brush for your masterpiece—each stroke shapes your vision. By understanding their strengths and tailoring your settings, you craft lines as clear as a well-placed word in a story. Remember, your material and design complexity are the guiding stars. With patience and precision, you’ll forge engravings that shine with clarity, turning every project into a symbol of your skill and artistry.