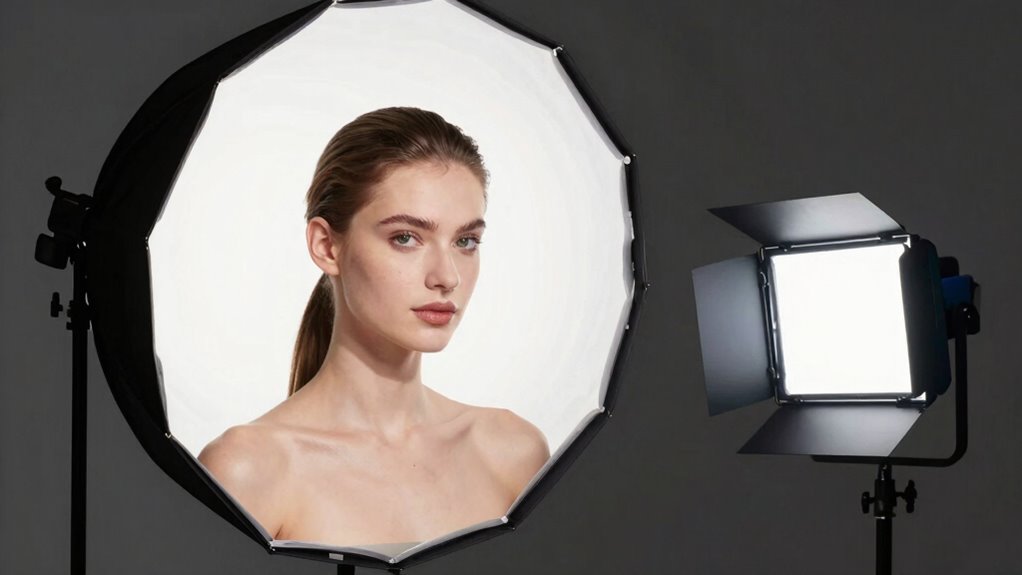
Lighting kits give you control over how your photos and videos look by shaping and diffusing light. Softboxes spread out light softly, flattering subjects and reducing harsh shadows, while LED panels are portable and adjustable for versatile setups. Shadows add depth, mood, and dimension, helping tell better visual stories. Understanding these tools and effects can dramatically improve your results. Keep exploring to unbolt even more tips and tricks for professional-looking lighting setups.
Key Takeaways
- Lighting kits include softboxes and LED panels, each offering unique control over light softness, diffusion, and versatility for different shooting needs.
- Softboxes produce diffused, gentle light ideal for portraits and studio setups, reducing harsh shadows for a polished look.
- LED panels are portable, adjustable, and suitable for quick setups, providing broad, even illumination in various environments.
- Shadows created by lighting influence mood, depth, and texture; controlling their position and contrast enhances visual storytelling.
- Proper use of diffusers, grids, and strategic positioning ensures balanced, natural-looking light while minimizing unwanted spill and harsh shadows.

Torjim Softbox Photography Lighting Kit, 16'' x 16'' Professional Softbox Lighting Kit with 85W 3000-7500K LED Bulbs, Studio Lights for Photography/Video Recording/Live Streaming/Portraits Shooting
【Illuminate Your Creativity】 Torjim softbox lighting kit is made of high-quality PET fabric and a foldable nylon cover,…
As an affiliate, we earn on qualifying purchases.
As an affiliate, we earn on qualifying purchases.
What Are Lighting Kits and Why They Matter for Photos and Videos

Lighting kits are essential tools that help you control and enhance the quality of your photos and videos. They allow you to adjust the color temperature, making your images appear warmer or cooler to match your creative vision. Proper lighting also minimizes light spill, ensuring that unwanted areas aren’t illuminated, which keeps your shots clean and professional. With a lighting kit, you can create consistent illumination, whether indoors or outdoors, giving you flexibility and control. They’re especially helpful when natural light isn’t enough or when you want a specific mood. By mastering your lighting setup, you ensure your subjects look their best and your footage is vivid and accurate. In short, lighting kits are invaluable for elevating your visual storytelling. Modern lighting technology continues to advance, offering more energy-efficient and adaptable options for creators.

2-Pack Photography Lighting Kit, NiceVeedi 25W LED Video Light Kit, 2900-7000K Dimmable Studio Light with Tripod Stand, 73" Stream Light for Video Recording
【MULTIPLE COLOR TEMPERATURE & ADJUSTABLE BRIGHTNESS】Provide 3 Color temperatures (2900K, 4800K & 7000K)to create various lighting atmosphere; This…
As an affiliate, we earn on qualifying purchases.
As an affiliate, we earn on qualifying purchases.
Getting to Know Softboxes: Diffusing Light for Flattering Shots

Softboxes are a popular tool in photography and videography because they effectively diffuse light, creating a softer, more flattering illumination on your subject. This diffusion reduces harsh shadows and evens out the light, making your shots look more professional. When using a softbox, you can better control the color temperature, ensuring consistent, natural tones. They also minimize light spill, so unwanted light doesn’t brighten background areas or cause glare. Imagine the following:
- Light gently wrapping around your subject’s face
- Even skin tones with minimal blemishes
- Controlled spill illuminating only what you want
- Consistent color temperature for accurate color rendering
- Soft shadows that add depth without harsh lines
Understanding light diffusion helps you appreciate how softboxes contribute to achieving a natural and polished look in your images.

NEEWER Upgraded Softbox Diffuser for NL660 RGB660 PRO II LED Video Light Panel, 12.6"x11.6" Foldable with Grid/Bag/Blackout Hood, No Need to Remove barndoors Quick Set Up for Soft Light, NS4S
【For NEEWER 660 LED Light Panel Series】 Exclusively compatible with NEEWER RGB660 PRO/NL660/RGB660 PRO II LED video light…
As an affiliate, we earn on qualifying purchases.
As an affiliate, we earn on qualifying purchases.
LED Light Panels: Versatile and Adjustable Lighting Solutions

LED light panels deliver just that. They feature adjustable color temperature, allowing you to switch seamlessly between warm and cool tones to match your scene’s mood or ambient light. Their broad, flat design provides even light distribution, reducing harsh shadows and enhancing light diffusion for smooth, natural results. You can modify these panels to suit different environments and creative needs, whether you’re shooting indoors or outdoors. Plus, many models are dimmable, giving you complete control over brightness. This flexibility makes LED light panels ideal for interviews, product shots, or cinematic filming, all while maintaining consistent, high-quality illumination. They’re a reliable choice for anyone seeking adjustable, efficient lighting on the go. Proper light diffusion helps create a more natural-looking scene by minimizing imperfections and harsh shadows, which is especially important in color accuracy and achieving realistic visuals. Incorporating diffusion materials can further enhance the light quality and softening effect, ensuring the light remains consistent in different environments. Additionally, understanding light placement is crucial for optimizing the use of LED panels and achieving the desired mood and clarity.

NEEWER 9" LED Video Light Panel, Dimmable DSLR Camera Soft Lighting with Mini Desk Tripod Stand, USB Type C Ports, 3200K~5600K CRI95+ for Studio Photography Video Recording Live Streaming, NL-116AI
【Versatile LED Video Light Panel Kit】 The 9" LED video key light features 58 warm and 58 cool…
As an affiliate, we earn on qualifying purchases.
As an affiliate, we earn on qualifying purchases.
Softboxes vs. Light Panels: Which Is Right for You?
Choosing the right lighting setup depends on your specific needs and shooting environment. Softboxes and light panels each have strengths suited to different situations. Softboxes produce a soft, diffused light that minimizes light spill and provides consistent color temperature, ideal for portraits or controlled studio shoots. Light panels, on the other hand, are more versatile and portable, offering adjustable brightness and color temperature, but can sometimes create more light spill if not carefully directed. If you need precise control over shadows and a focused beam, softboxes are better. For quick setups and broader coverage, light panels work well. Consider your space, desired light quality, and how much light spill you can manage when choosing between the two. Additionally, understanding lighting quality and how different setups affect your images can help you make a more informed decision. Recognizing the impact of shadow control can help you achieve the desired mood and clarity in your photographs.
How Shadows Add Depth and Mood to Your Photos and Videos

Shadows play an essential role in shaping the mood and depth of your photos and videos, guiding the viewer’s eye and highlighting textures or forms. Using shadow contrast effectively can add visual interest and dimension, making your subjects stand out. Deeper shadows create a sense of mystery or drama, while softer shadows offer a more gentle, natural feel. By controlling shadow contrast, you enhance mood, emphasizing emotion or atmosphere. Shadows also help define shapes and add layers to your composition, making scenes more engaging. Properly crafted shadows give your visuals a three-dimensional quality, pulling viewers into the scene. When you understand how to manipulate shadow contrast, you can craft images and videos that evoke specific feelings and add richness to your storytelling. Understanding light and shadow is fundamental to creating compelling visual narratives. Additionally, mastering how to manage shadow contrast allows you to better control the overall aesthetic and impact of your images, especially as it relates to AI-powered tools that can assist in analyzing and enhancing lighting effects, including shadow contrast control. Recognizing the importance of visual storytelling helps artists employ shadows intentionally to communicate mood and narrative depth.
Positioning Lights to Create Natural and Artistic Shadows

Properly positioning your lights is key to creating shadows that look natural or artistically striking. You control how shadows fall by adjusting the light’s angle, distance, and height, considering color temperature to match the scene’s mood. Keep an eye on light spill, preventing unwanted areas from becoming overexposed or distracting. For natural shadows, place lights at a 45-degree angle from your subject, mimicking sunlight. To craft artistic shadows, experiment with harsher or softer light, moving it closer or farther away. Understanding lighting fundamentals helps you make smarter decisions about shadow placement and mood. When you understand how light positioning influences shadow behavior, you can more effectively sculpt the scene to achieve your desired artistic effect. – Imagine a warm glow highlighting one side of your subject, casting soft shadows. – Picture a harsh light creating sharp, dramatic lines for artistic effect. – Visualize light spilling onto backgrounds or floors, adding depth. – Envision adjusting color temperature for a cool or warm shadow tone. – Think about how shadow placement shapes mood and focus. Additionally, awareness of different lighting kits, such as softboxes and panels, enables precise control over shadow softness and intensity, enhancing your creative options. A good understanding of support breakfast options can also inspire creative lighting setups that highlight certain textures or elements in a scene. Moreover, exploring various lighting markets can provide insight into the latest equipment and trends to elevate your lighting design.
Choosing the Best Lighting Kit for Your Budget and Skill Level

Selecting the right lighting kit can considerably impact your photography or videography, especially when balancing your budget and skill level. Start by considering the color temperature; if you want consistent, natural-looking light, choose kits with adjustable color temperature settings. This feature allows you to adapt to different environments and achieve the desired mood. Also, evaluate the power output; higher wattage or lumens provide brighter light, which is essential for larger shoots or outdoor conditions. For beginners, budget-friendly LED panels or softboxes with lower power output may suffice, while more advanced users might opt for professional kits with higher power and versatile controls. Additionally, understanding the importance of lighting shadows can improve your ability to create depth and mood in your images. As the Pen Vape market demonstrates, innovative features and safety considerations play a crucial role in device selection, emphasizing the need for mindful choices based on your specific needs. Incorporating lighting techniques, such as controlling shadows and highlights, can elevate your visual storytelling and overall image quality. Proper placement and lighting safety protocols are also essential to prevent accidents and ensure optimal results.
Common Lighting Setup Mistakes and How to Avoid Them

One common mistake in lighting setup is neglecting to contemplate the direction and placement of your lights, which can lead to flat or unflattering images. Poor positioning hampers shadow manipulation, making scenes look dull or overly harsh. Additionally, ignoring color temperature can result in unnatural hues that clash with your subject. To avoid this, visualize how light falls on your subject:
Poor light placement and color choices can flatten images and create unnatural hues.
- Shadow edges too sharp or too soft
- Unbalanced highlights and shadows
- Colors that look off or inconsistent
- Flat lighting with no depth
- Shadows falling in unintended areas
Adjust your lights to create natural shadow shapes and control their intensity. Use gels or white balance settings to manage color temperature, ensuring your lighting complements your scene without distracting the viewer. Proper setup enhances depth and mood, making your images more compelling. Remember, lighting placement is crucial for creating a dynamic and appealing visual. Incorporating an understanding of lighting principles and proper light modifiers can significantly improve your results.
Lighting Tips to Make Your Photos Look More Professional

To make your photos look more professional, focus on mastering the fundamentals of lighting. Start by adjusting the color temperature to match the mood you want to create—warmer tones evoke intimacy, while cooler tones feel clinical or modern. Consistent color temperature across your lights prevents color casts that can distract viewers. Pay attention to light falloff, ensuring your subject is well-lit without harsh shadows or overexposure. Proper light falloff creates depth and dimension, making your images more engaging. Use soft, diffused light for flattering portraits and sharper, direct light for dramatic effects. Balancing these elements helps your photos appear polished and intentional, elevating your work from amateur to professional quality.
Essential Accessories and Tricks to Elevate Your Lighting Setup

Adding accessories like diffusers and grids can instantly improve your lighting quality and control. Proper light positioning techniques help you shape your shot and avoid unwanted shadows. Mastering these tools and methods will take your setup to the next level.
Diffusers and Grids
Diffusers and grids are essential tools that can dramatically improve your lighting setup by controlling light quality and direction. Diffusers soften harsh light, creating a more flattering, even glow. They come in various diffuser textures, each offering different levels of diffusion and mood. Grids, on the other hand, focus light and reduce spill, giving you precise control over where the light falls. Grid patterns help shape the beam, preventing unwanted light spread and emphasizing specific areas. These accessories allow you to craft the perfect atmosphere and manage shadows effectively. With diffusers and grids, you can transform a basic setup into a professional-looking scene, ensuring your lighting complements your subject perfectly.
- Soft, textured light from different diffuser textures
- Narrow, controlled beams with grid patterns
- Dramatic shadows or gentle falloff
- Precise light placement without spill
- Enhanced mood and focus in your shot
Light Positioning Techniques
Effective light positioning is essential for creating a compelling and professional look in your scenes. By adjusting shadow placement and light angles, you control the mood and depth of your shot. For example, placing lights at a 45-degree angle to your subject softens shadows and adds dimension, while high or low angles create dramatic effects. Experiment with different positions to see how shadows fall and how your subject’s features are highlighted. Use the table below for quick reference:
| Light Positioning Technique | Effect on Shadow Placement |
|---|---|
| 45° angle | Soft, natural shadows |
| Direct front | Flat lighting, minimal shadows |
| High angle | Downward shadows, dramatic |
| Low angle | Upward shadows, intense |
Mastering these techniques enhances your scene’s visual storytelling.
Frequently Asked Questions
How Do I Choose the Right Lighting Kit for My Specific Photography Style?
You should choose a lighting kit based on your lighting style and budget considerations. Think about whether you prefer soft, diffused light or more controlled, dramatic shadows. If you’re just starting out, affordable softboxes or LED panels offer versatility. For advanced work, consider more specialized lighting. Always match your kit to your photography goals, ensuring it aligns with your creative vision without exceeding your budget.
What Maintenance Is Required for Softboxes and LED Panels?
Maintaining your softboxes and LED panels is like caring for a trusted friend. You’ll need to regularly clean the surfaces with a gentle cloth to prevent dust buildup. For LED panels, check and replace bulbs when they burn out, just like changing a light bulb at home. Keep vents clear for proper cooling, and store everything in a dry, safe place. With routine care, your lighting gear stays bright and reliable.
Can I Use Multiple Types of Lights Together Effectively?
Yes, you can use multiple types of lights together effectively in your multi light setups. Just make certain lighting compatibility by checking color temperature and power ratings so they blend seamlessly. Adjust your lights’ positions and intensities to balance shadows and highlights. Using different lights like softboxes and LED panels adds depth and dimension to your scene, making your shots look professional and well-lit.
How Do I Control Color Temperature in My Lighting Setup?
Think of your lighting setup as a painter’s palette; controlling the color temperature is key. You do this by adjusting your lights’ color balance, usually on the Kelvin scale. Lower Kelvin values give warm, amber tones, while higher ones produce cool, bluish hues. Use dimmers or adjustable LED panels to fine-tune these settings, ensuring your scene’s mood matches your creative vision with a simple, effective control over warmth and coolness.
What Safety Precautions Should I Follow When Using Professional Lighting Equipment?
When using professional lighting equipment, prioritize electrical safety by inspecting cords for damage and avoiding overloading circuits. Always follow manufacturer instructions and keep equipment dry to prevent shocks. Manage heat by ensuring proper ventilation and avoiding contact with hot surfaces. Use safety gloves when handling hot lights, and turn off equipment when not in use. Staying alert to these precautions helps protect you and prolongs your gear’s lifespan.
Conclusion
Whether you choose softboxes or LED panels, remember shadows are your secret weapon, adding depth and mood to your shots. While sleek kits might seem tempting, mastering basic lighting techniques can elevate your photos more than expensive gear. So, don’t just chase the latest tech—experiment with shadows and angles. In the end, it’s your creativity and understanding of light that truly make your images stand out.