Discover simple paper cutting techniques that create impressive symmetrical designs perfect for beginners. By folding paper carefully and cutting along pre-creased lines, you can produce intricate patterns like snowflakes or mandalas with ease. These projects highlight how basic folds and cuts reveal natural and cultural symbols of balance and harmony. With practice, you’ll see how symmetry brings beauty and meaning to your art. Keep exploring to unleash even more amazing ways to make symmetrical paper designs.
Key Takeaways
- Use simple folding techniques like halving or quarter folding to create symmetrical paper cut designs easily.
- Start with basic geometric patterns or motifs inspired by nature, such as snowflakes or butterflies.
- Draw or pre-crease your design lines before cutting to ensure symmetry and precision.
- Incorporate cultural symbols like mandalas or textile patterns that rely on symmetry for visual impact.
- Experiment with repetitive shapes and lines to develop intricate yet manageable paper cut projects.
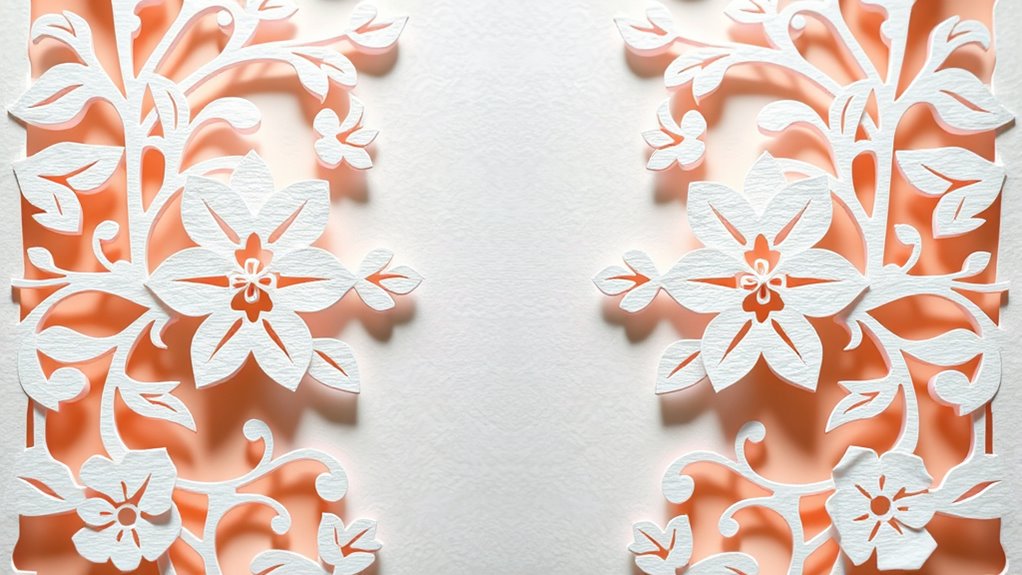
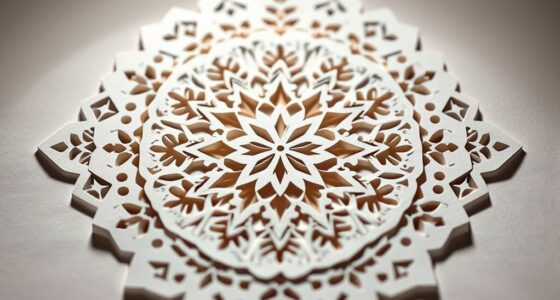
Symmetry projects offer a fascinating way to explore the balance and harmony in art, science, and design. When you dive into paper cutting activities, you tap into the world of mathematical patterns that underpin many natural and man-made structures. These patterns aren’t just visually appealing—they reveal the underlying order in chaos and highlight how symmetry can be both functional and decorative. As you cut and fold, you’ll notice that many cultural symbols, from mandalas to traditional textiles, rely heavily on symmetry to convey meaning and aesthetic harmony. Recognizing these patterns can deepen your appreciation for how different cultures express their beliefs and values through repetitive, balanced designs.
Exploring symmetry reveals the beauty and order in art, nature, and cultural symbols through balanced, repetitive designs.
When you start a paper cutting project, you’ll find that symmetry is the key to creating visually stunning results with minimal effort. You begin by folding your paper precisely in half or into quarters, which sets the stage for perfect mirror images. As you cut along your drawn or pre-creased lines, you’re essentially translating complex mathematical patterns into tangible art. This process demonstrates how symmetry isn’t just an abstract concept but a practical tool that guarantees your design looks cohesive and balanced on both sides. The beauty of paper cutting lies in how simple folds and cuts can produce intricate patterns that reflect nature’s own symmetrical designs—think snowflakes, flower petals, or butterfly wings—each rooted in mathematical principles. You’ll see firsthand how these patterns repeat, creating a sense of unity and order that’s both satisfying and mesmerizing.
Moreover, you’ll notice that cultural symbolism often employs symmetry to convey deeper meanings. For example, many religious or cultural motifs use symmetrical patterns to symbolize balance, harmony, and spiritual perfection. By engaging in paper cutting, you’re not just making decorative shapes; you’re participating in a tradition that has been used for centuries to express cultural identity and spiritual beliefs. These designs often serve as visual stories that communicate shared values, and your hands-on approach helps you internalize their significance. Additionally, understanding patterns in nature can enhance your appreciation for how symmetry appears in everything from the structure of crystals to the wings of insects. As you experiment with different shapes and arrangements, you’ll see how symmetry enhances the storytelling aspect of art, making your projects not only beautiful but also rich with cultural symbolism.
In the end, your paper cutting symmetry projects will show you that simple techniques can reveal complex visual and cultural meanings. By understanding the mathematical patterns behind the designs and appreciating their cultural symbolism, you’ll gain a deeper respect for the art of symmetry. Whether you’re creating a decorative piece or exploring the principles of balance, these projects prove that symmetry is a universal language—one that you can speak through your own hands, creating awe-inspiring art with just paper and scissors.
Frequently Asked Questions
What Tools Are Best for Paper Cutting Symmetry Projects?
When choosing tools for paper cutting symmetry projects, you want sharp, precise options like craft knives or scissors. These tools help you achieve clean, accurate cuts for your designs. Make sure to follow proper cutting techniques to avoid mistakes, and prioritize tool safety by using cutting mats and handling blades carefully. With the right tools and safety measures, you’ll create stunning symmetrical paper art easily and confidently.
Can Symmetry Projects Be Made With Recycled Paper?
You might be surprised to find that symmetry projects can definitely be made with recycled paper. By using simple recycling techniques, you turn old paper into beautiful, eco-friendly materials perfect for intricate designs. Not only does this reduce waste, but it also adds a unique texture and character to your artwork. So, your creative symmetry projects can be both stunning and sustainable, proving that beauty and environmental consciousness go hand in hand.
How Long Does It Typically Take to Complete a Project?
The project completion time varies based on your skill level adjustments and the complexity of your design. For beginners, it might take a couple of hours, while more experienced crafters can finish quicker. Keep in mind that intricate patterns demand more time and patience. Overall, expect to spend anywhere from 30 minutes to several hours, depending on your familiarity with paper cutting and the project’s detail.
Are There Age Restrictions or Recommended Age Groups?
This question is a goldmine for exploring age considerations and beginner suitability in paper cutting projects. You’ll find that most projects are designed to be accessible for a wide age range, from young children to adults. While younger kids might need supervision, these projects are simple enough for beginners of all ages. It’s like a creative playground where everyone can join in, making it perfect for family fun or solo craft time.
How Can I Modify Designs for Different Skill Levels?
To modify designs for different skill levels, you should focus on skill level adaptation by simplifying or adding details as needed. Start with basic shapes for beginners and gradually introduce more complex patterns for advanced crafters. Adjust the design’s intricacy, size, or cutting techniques to suit each skill level. This approach guarantees everyone can enjoy paper cutting, making the project accessible and enjoyable for all skill levels.
Conclusion
Now that you’ve explored these easy symmetry projects, you’re ready to impress with your paper-cutting skills. Did you know that humans are naturally drawn to symmetrical designs—our brains find them 30% more appealing? So, as you create, remember that your art not only looks amazing but also taps into something our minds love. Keep experimenting with different patterns, and you’ll be amazed at what you can achieve with just paper and scissors!