
TL;DR
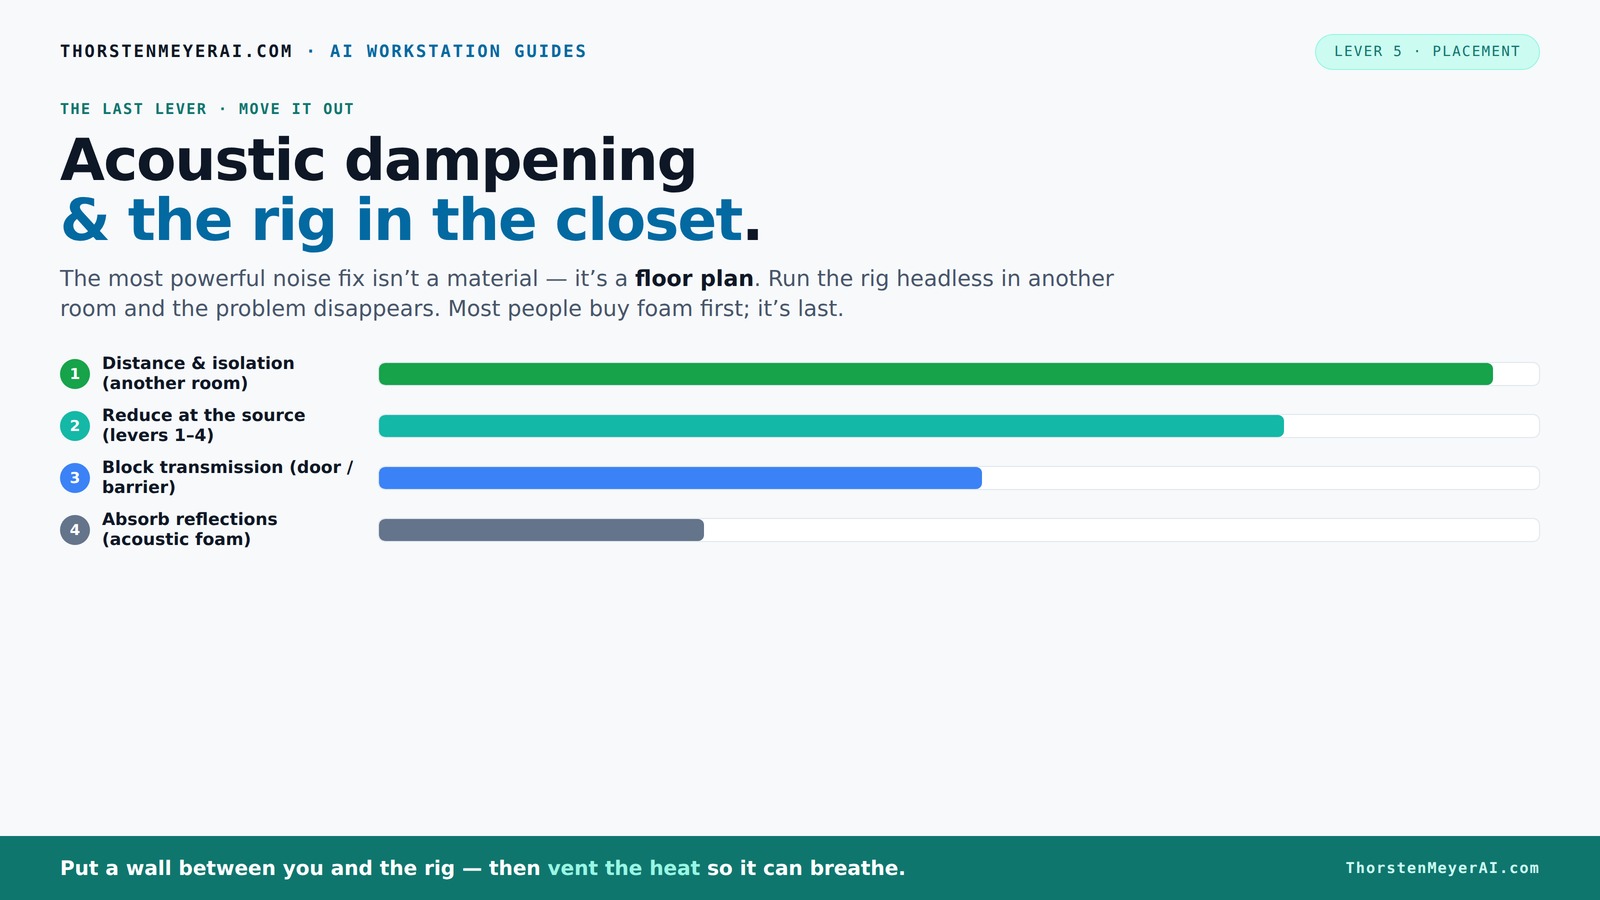
The biggest impact on sound quality in a closet comes from strategic placement and proper isolation, not just adding foam. Moving the rig out of your space or creating a vented, sealed enclosure makes a huge difference. Foam absorbs reflections but doesn’t block noise — focus on barriers and vibration isolation first.
Ever tried recording vocals in a closet? It’s a mixed bag. Sure, it’s convenient and cheap, but without proper setup, all you hear is echo, room noise, and that annoying boxy sound. The secret isn’t just slapping up foam. It’s about understanding where sound comes from, how it travels, and what really makes a difference. This guide breaks down the smartest ways to turn your tiny closet into an effective vocal booth — with practical tips on placement, dampening, and the right tricks to keep noise out while making the most of limited space.
Whether you’re a podcaster, voice-over artist, or just want cleaner recordings in a rental apartment, knowing how to treat small rooms saves you money, frustration, and that awkward sound. We’ll cover the actual priorities — from where to put panels to how to handle low-end issues — so you can make smart choices without wasting time or money. Ready? Let’s dive into turning your closet into a quiet, effective studio.
Acoustic dampening
& the rig in the closet.
The most powerful noise fix isn’t a material — it’s a floor plan. A rig you can’t hear because it’s in another room beats any amount of foam. Tap the approaches in Part 1 to see what actually works.
(another room)
(levers 1–4)
(door / barrier)
(acoustic foam)
Contain the noise, not the heat
Key Takeaways
- Prioritize moving your rig out of the room or into a sealed, ventilated enclosure before adding foam or absorption materials.
- Place your microphone away from reflective surfaces and use reflection filters for cleaner vocals in small spaces.
- Seal gaps around doors and vents, use bass traps in corners, and add mass to walls for effective soundproofing.
- Control low-end buildup with strategically placed bass traps — don’t ignore low frequencies in small rooms.
- Good ventilation is essential if you seal your closet; ducted exhaust fans and thermostatic controls keep gear cool and noise quiet.

Portable Recording Booth for Home Studio, Foldable Sound Isolation Vocal Shield with Floor Stand, High-Density Acoustic Blanket Enclosure for Singing, Voiceover & Podcast, Includes Phone Holder
INSTANT STUDIO-QUALITY "DRY" SOUND: Transform any noisy room into a professional vocal booth instantly. Engineered with high-density acoustic...
As an affiliate, we earn on qualifying purchases.
As an affiliate, we earn on qualifying purchases.
Why Your Closet Creates Echo and Boom — And How to Fix It
Closets are tiny, enclosed spaces filled with parallel walls, shelves, and clothes. They reflect sound like crazy, creating a hollow, boomy effect that ruins vocal clarity. The first step is understanding why this happens. Think of your closet as a small, mirror-lined box that amplifies echoes and sound waves bouncing between surfaces. For more on controlling sound reflections, see acoustic dampening and placement.
For example, singing in a closet without treatment sounds like singing inside a metal can — sharp, echoing, and harsh. To fix this, start with basic placement strategies: position your mic and performer away from direct reflective surfaces, and add soft materials like blankets or acoustic panels where sound bounces most. That’s the first line of attack.
Remember: the goal isn’t just to absorb sound — it’s to reduce reflections and prevent the room from acting like a giant echo chamber. Covering walls with thick blankets or foam panels near reflection points can cut down harshness significantly. But don’t forget, the real challenge is controlling sound that leaks out — which brings us to the next step. Learn more about sealing gaps and adding mass at scientific testing devices.
Deeply understanding why small, enclosed spaces cause these issues helps you prioritize what to treat. The reflections are a result of sound bouncing between parallel surfaces, creating standing waves and echoes that muddy your recordings. Addressing these reflections with strategically placed absorptive materials reduces reverberation, but the tradeoff is that foam alone doesn’t stop sound from escaping. That’s why sealing gaps and adding mass are crucial for true soundproofing. Recognizing reflection points—like where sound tends to bounce most—allows you to target your treatments effectively, saving money and space while maximizing results.

18 Pack Black Acoustic Panels 12"X12"X 0.4"Sound Absorbing Panel Wall Decoration Soundproof Wall Panels High-Density Sound Deadening Panels Acoustic Treatment Panel For Home Studio
[Material Safety] The wall sound proof panels is made of polyester fiber, which has better ductility and wear...
As an affiliate, we earn on qualifying purchases.
As an affiliate, we earn on qualifying purchases.
Where to Place Microphone and Reflection Treatment for Best Results
Placement is king in a tiny closet. The first rule: keep your mic away from reflective surfaces like walls, shelves, or clothes racks. Position your mic about 6 to 12 inches away from the wall behind it — not directly against it. Use a reflection filter or a portable acoustic panel behind the mic to catch bouncing sound waves.
For the performer, sit or stand in the least reflective spot, usually a few inches away from the door or the open side of the closet. Use a mirror test: if you see your reflection in the wall, you’re probably getting too much reflection. Move slightly to find that sweet spot where sound feels natural and less echoey.
In terms of treatment, focus on the reflection points: the wall behind the mic, the ceiling, and the side walls facing the source. Cover these with acoustic panels, foam, or even a blanket draped over a frame. For low-end control, add bass traps in corners to tame boomy frequencies.
Understanding why placement matters is essential: positioning your mic and performer to minimize reflections reduces the need for excessive treatment and prevents phase issues. Proper placement ensures your recordings are clear and focused, avoiding the trap of over-treating or under-treating the space. It’s a balancing act—too close to reflective surfaces amplifies echo; too far away can pick up more room noise. Finding the optimal spot enhances clarity and makes your treatments more effective, ultimately saving you money and effort. For detailed tips, see placement and acoustic treatment strategies.

Tuneful Cables Sound Isolation Pads. Cork Pads for Turntables to Reduce Vibration & Skipping (1" Pack of 4)
ELEVATE YOUR TURNTABLE'S PERFORMANCE. Tuneful Cables Cork Isolation Pads for Turntables absorb unwanted vibrations so your turntable can...
As an affiliate, we earn on qualifying purchases.
As an affiliate, we earn on qualifying purchases.
What to Cover Walls, Doors, and Floors to Stop Sound Leaks
Soundproofing a closet isn’t just about absorbing reflections; it’s about sealing gaps and adding mass. Acoustic foam blocks echoes inside, but it doesn’t stop noise from leaking out. To truly quiet your setup, focus on sealing cracks, gaps, and the door. Learn more about effective acoustic sealing at scientific methods for soundproofing.
Use weatherstripping around the door frame, acoustic sealant in cracks, and a heavy curtain or door cover to block sound escape. Thick carpets or rugs on the floor can reduce reflections and absorb impact noise, but they won’t stop sound from passing through the walls.
For a more serious setup, consider installing a second layer of drywall with damping glue, or adding mass-loaded vinyl to the door. These are more involved but make a real difference. When renting, removable solutions like blankets or portable panels are your best friends.
Understanding the implications of sealing gaps and adding mass is crucial: every crack or hole that isn’t sealed allows sound to escape, undermining your efforts. Using mass-loaded vinyl or additional drywall increases the density of your barriers, making it harder for sound waves to pass through. The tradeoff is that these solutions can be more expensive or less portable, but they dramatically improve isolation. Sealing gaps and adding mass effectively creates a barrier that prevents sound leakage, enabling your recordings to be cleaner and less contaminated by outside noise. Recognizing where leaks happen and addressing them systematically is key to turning a closet into a genuinely soundproof space.

Desktop Soundproof Cover, Portable Vocal Booth, Microphone Isolation Booth Cube
Material:The acoustic Cover is made of 12mm thick, 5.8kg high density acoustic cotton with 3 layers of powerful...
As an affiliate, we earn on qualifying purchases.
As an affiliate, we earn on qualifying purchases.
How to Handle Low-End Buildup Without Making It Worse
Small rooms tend to boost bass frequencies, creating a boomy, muddy sound. Acoustic dampening alone often isn’t enough. You need bass traps in the corners to absorb low frequencies and prevent standing waves. Without them, your vocals or recordings will sound hollow or muffled.
Place bass traps strategically in the room’s corners — where low-end buildup is most intense. Two-inch thick panels are enough for a small closet if low frequencies are your concern. For larger spaces or serious low-end issues, go thicker or add a dedicated subwoofer trap.
Understanding why low-end issues occur is essential: in small, enclosed spaces, sound waves reflect and interfere, creating peaks and nulls that distort the true tone. Bass traps help by absorbing these low frequencies, smoothing out the response. The tradeoff is that improper placement can sometimes deaden the sound too much or shift the frequency response undesirably. Properly installed bass traps in the right spots prevent these issues, resulting in clearer, more balanced recordings. Ignoring low-end control can lead to recordings that sound boomy or muffled, especially when using close-miking techniques. Effective low-frequency management ensures your vocals sit naturally in the mix, providing a more professional sound without complex EQ or processing.
Budget vs. Premium: What You Really Need for a Closet Booth
On a tight budget? Focus on simple, effective solutions — blankets, reflection filters, and a few strategically placed panels. Cover as much wall surface as possible with budget-friendly foam or fabric to cut down on echoes. Use rubber feet or isolation pads beneath your gear to reduce vibration noise.
For a higher-end setup, invest in professional-grade acoustic panels, bass traps, and a soundproof door or enclosure. Combine these with a good ventilation system if you’re sealing a closet for continuous use.
Understanding the tradeoffs is key: budget solutions can be surprisingly effective if applied thoughtfully, but they might not provide the same level of isolation or low-frequency control as premium options. The main consideration is balancing cost, space, and your specific needs. For instance, adding a few well-placed panels and sealing gaps might outperform a full foam wall if done strategically. Conversely, investing in quality bass traps and sealing techniques yields better long-term results for serious recording. Tailoring your approach based on your goals and budget ensures you get the best value while achieving the desired sound quality.
Practical Tips to Keep Your Closet Quiet and Cool
Ventilation is the biggest challenge when sealing a closet for noise reduction. A sealed space traps heat, risking overheating of your gear. Use quiet intake and exhaust fans, or ducted ventilation, to keep airflow steady. Consider an active cooling system or liquid cooling if heat becomes an issue.
For DIY solutions, a small computer fan with a duct can pull hot air out while keeping noise low. Make sure to position vents away from the mic to prevent airflow noise contaminating your recordings.
Understanding the importance of ventilation is vital: sealed spaces tend to trap heat, which can damage equipment and affect recording quality. Proper ventilation not only keeps your gear functioning optimally but also prevents thermal noise from being picked up by sensitive microphones. Choosing quiet fans or ducted systems ensures you don’t introduce new noise sources. The tradeoff involves balancing acoustic isolation with thermal management—sometimes requiring creative solutions like ducting or thermostatic controls. Effective ventilation solutions enable you to maintain a comfortable, safe, and quiet environment for long recording sessions, making your closet studio sustainable over time.
The Big Picture: Don’t Overestimate Foam’s Power
Acoustic foam is a popular fix, but it’s not a magic bullet. Foam absorbs reflections inside the room but does little to stop sound from escaping or external noise from coming in. Many users assume foam alone will soundproof their closet — it won’t.
Real soundproofing involves sealing gaps, adding mass, and decoupling vibrations. Foam is just part of the picture, useful for reducing echo and harshness, not total isolation. Recognizing its limitations helps you avoid wasting money on ineffective treatments and focus on the strategies that truly matter.
For example, a small closet with foam panels still leaked enough external noise to be noticeable on recordings. When the door was sealed and gaps filled, the noise dropped dramatically. This demonstrates that foam alone cannot block out external sounds—sealing and adding mass are essential for meaningful isolation. Understanding that foam is primarily an interior acoustic treatment prevents you from over-investing in solutions that won’t deliver the desired soundproofing, guiding you toward more effective, comprehensive strategies.
Frequently Asked Questions
What is the difference between acoustic dampening, acoustic treatment, and soundproofing?
Acoustic dampening reduces echo and reflections inside a room using foam or panels. Acoustic treatment improves sound quality within the space but doesn't block sound from leaving. Soundproofing stops noise from escaping or entering, sealing gaps and adding mass to walls and doors.
Where should I place acoustic panels in a closet recording booth?
Place panels at reflection points — behind the mic, on side walls facing the source, and on the ceiling. Covering about 75% of the wall area with foam or panels makes a noticeable difference. Use a mirror trick to identify reflection points easily.
Do I need bass traps in a small closet?
Yes. Bass traps in the corners help control low-frequency buildup, preventing a boomy, muddy sound. Two-inch thick panels are sufficient for small closets, but larger or more problematic spaces may require thicker or multiple traps.
Is a closet good enough for recording vocals?
Yes, with proper placement and treatment, a closet can produce excellent vocal recordings. But it’s not ideal for loud instruments or full band recordings. Focus on sealing gaps, controlling reflections, and managing low-end issues for best results.
How much wall coverage do I need for noticeable improvement?
Covering at least 75% of the walls with acoustic panels or foam provides significant echo reduction. Full wall coverage is better if space allows, especially in small, reflective rooms like closets.
Conclusion
Transforming a closet into a usable recording space isn’t about piling up foam. It’s about smart placement, sealing gaps, and controlling vibrations. Think of your closet as a shell — with the right tweaks, it can hide your noise and give you cleaner, clearer recordings.
Remember, the biggest gains come from moving the rig away or creating a vented, sealed enclosure. Focus your efforts on these high-impact strategies, and your closet will sound better than you ever expected. Now, go turn that tiny space into your secret studio.