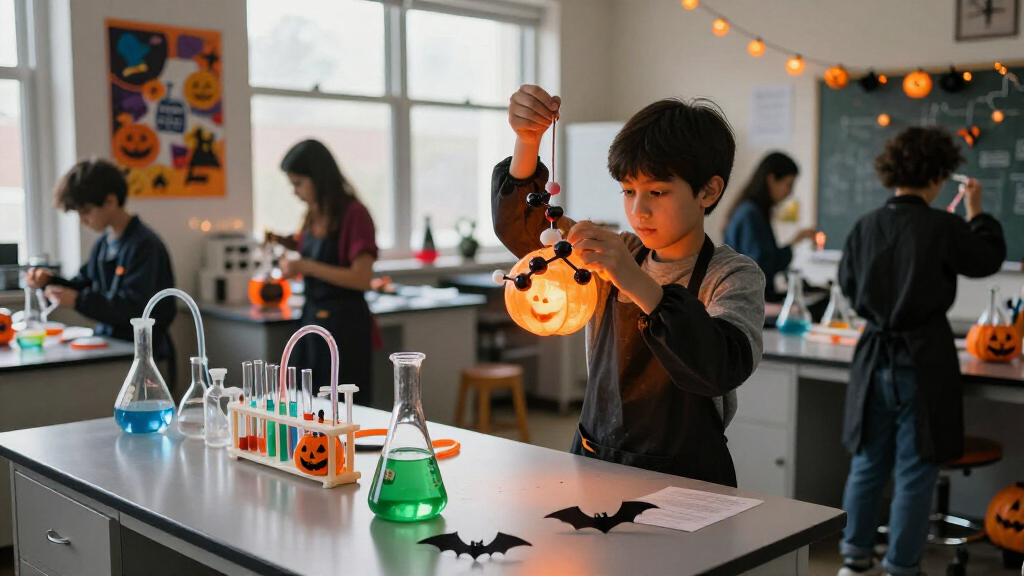
Build a science-themed Halloween display with labeled specimens, bubbling-looking laboratory props, glowing accents, and a clear focal point. This guide is for beginners decorating a home, classroom, or party space; the projects use common craft supplies and take about 2-3 hours, plus drying time for paint or glue. You will finish with a coordinated display that looks like a playful haunted laboratory and remains safe around guests.

Prime made for students and young adults
- Fast, free delivery for dorm and study essentials
- Prime Video and Amazon Music included
- Member-only deals

24-Piece Halloween Mad Scientist Lab Props Kit
- ✔ Brand: Tiangrid
- ✔ Pieces: 24
- ✔ Included items: 6 measuring cups, 3 measuring cylinders, 8 simulated spiders, 5 eyeballs, 2 green string lights
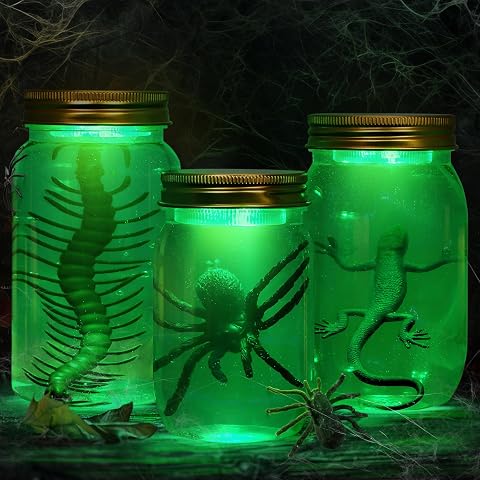
DIY Halloween Specimen Jar Decoration Set with Remote-Controlled LED Lights, 3 Pieces
- ✔ Jar count: 3 specimen jars
- ✔ Included creatures: 2 spiders, 2 centipedes, 2 geckos
- ✔ Customization: 5 paint colors and 3 adhesive stickers

Mad Scientist at Work Warning Sign
- ✔ Design: Mad Scientist at Work warning sign
- ✔ Intended use: Desk or tabletop decor
- ✔ Suitable settings: Offices, classrooms, home offices, research spaces
Difficulty: Beginner | Time: 2-3 hours
What You’ll Need
Tools & Materials:
- Clean jars, bottles, or clear plastic containers with lids
- Cardstock or paper for labels and signs
- Black, green, or purple craft paper or fabric for a backdrop
- Washable paint or food coloring
- LED tea lights or battery-powered string lights
- Scissors, tape, and washable glue
- Markers or a printer
- Optional: cotton batting, plastic insects, toy bones, and disposable gloves
Knowledge:
- Basic cutting, taping, and gluing
- Ability to keep decorations away from open flames and food
Set aside a table or floor area that can be covered with scrap paper. Wash and dry containers before decorating them. Use battery-powered lights rather than candles, and do not mix household chemicals to create smoke, bubbles, or color effects. Keep small pieces, jars, and cords out of reach of young children and pets.
24-Piece Halloween Mad Scientist Lab Props Kit
When we want a recognizable mad scientist scene without crafting every prop, this kit gives us the strongest foundation in the lineup. Its 24 pieces combine measuring cups, cylinders, simulated spiders, eyeballs, and two green string lights, so we can arrange both lab-style vessels and Halloween details together. Compared with the specimen jar set, it is more about furnishing a whole display than personalizing a few focal pieces; compared with the warning sign, it creates atmosphere through objects rather than a message.The assortment suits a party table, classroom corner, or haunted-house shelf where several props can work as a group. Plastic construction is described as reusable, which makes the kit more suitable for bringing back for seasonal displays than a one-off paper accent. The tradeoff is that the cups and cylinders are decorative props, not functional lab equipment. We also need to provide batteries for the lights, and the included green illumination offers less control than the specimen jars’ remote and multiple effects. It is our best all-around choice when breadth matters more than customization.
Pros:
- Includes 24 coordinated props for a fuller display
- Mixes lab-style vessels with spiders and eyeballs
- Plastic pieces are described as reusable
- Includes two green battery-powered string lights
Cons:
- Batteries for the string lights are not included
- Props are decorative rather than functional lab equipment
- Green string lights provide less lighting customization than the specimen jar set
Best for: We want a reusable, multi-piece mad scientist setup for a party table, classroom, or haunted-house display.
Not ideal for: We need real laboratory vessels, included batteries, or lighting with several selectable colors and effects.
Bottom line: We’d choose this kit when we want the most complete science-and-Halloween prop assortment with relatively little DIY work.
“We’d choose this kit when we want the most complete science-and-Halloween prop assortment with relatively little DIY work.”
DIY Halloween Specimen Jar Decoration Set with Remote-Controlled LED Lights, 3 Pieces
For a display with a few deliberate focal points, the specimen jars bring more creative control than the broader lab kit. We get three jars, faux creatures, five paint colors, stickers, and remote-controlled lights with 12 colors and four effects. That combination lets us give each jar its own look or coordinate the set with a party’s color scheme. The 24-piece kit supplies more kinds of props, but these jars offer a more unified centerpiece; the warning sign takes much less effort, though it cannot create the same visual scene.There is a real making step here: we need to paint and arrange the contents before the jars look finished. That work can suit a family activity or a host who wants a personalized table or fireplace display, but it makes this a less immediate option than arranging the lab kit. The waterproof LED lights and remote add flexibility to the finished arrangement, while seasonal styling limits their everyday role. Choose these when customization matters more than getting the most separate props in one set.
Pros:
- Three jars and faux creatures make a focused specimen display
- Includes five paint colors and adhesive stickers for customization
- Remote controls 12 LED colors and four lighting effects
- Waterproof LED lights are included
Cons:
- Requires DIY painting and assembly
- Three jars provide fewer separate display elements than the 24-piece kit
- Seasonal styling may limit use outside Halloween or themed events
Best for: We enjoy assembling decorations and want a customizable specimen display with adjustable lighting for a table or fireplace.
Not ideal for: We need a ready-to-place decoration, want a wide range of separate lab props, or prefer a display with no seasonal look.
Bottom line: We’d pick the specimen jars when a customizable, illuminated centerpiece is more useful than a ready-made spread of lab props.
“We’d pick the specimen jars when a customizable, illuminated centerpiece is more useful than a ready-made spread of lab props.”
Mad Scientist at Work Warning Sign
This sign takes the smallest footprint and has the clearest single purpose: adding a playful mad scientist message to a desk, office, or classroom. It can give a work area a science-themed Halloween touch without spreading props across a table. Compared with the 24-piece kit, though, it contributes humor rather than a full lab scene; next to the specimen jars, it has neither a customizable centerpiece nor lighting effects. It makes the most sense when space is limited or we want a modest accent alongside other decorations.The friendly “please don’t disturb” idea gives it some everyday novelty appeal for STEM enthusiasts and teachers, but the sign is described as decor rather than a functional lab notice. We should not rely on it for workplace safety or formal lab communication. Its simplicity is an advantage when setup and storage need to stay minimal, while the same narrow format makes it a weak standalone choice for a Halloween party or haunted-house display. Pair it with props if we want the science theme to read strongly across a room.
Pros:
- Adds a playful mad scientist message to a workspace
- Compact tabletop format suits desks and classroom corners
- Can work as a gift for STEM enthusiasts, teachers, or coworkers
Cons:
- Primarily novelty decor rather than a functional lab sign
- Does not provide a full Halloween display on its own
- Offers no lighting or customizable specimen details
Best for: We want a small, humorous science-themed accent for a desk, home office, or classroom.
Not ideal for: We need a visible Halloween centerpiece, multiple decorative elements, lighting, or a functional warning sign.
Bottom line: We’d choose the sign as a compact science-humor accent, not as the main decoration for a larger Halloween scene.
“We’d choose the sign as a compact science-humor accent, not as the main decoration for a larger Halloween scene.”
As an Amazon Associate we earn from qualifying purchases.
Before You Start
Choose one display area, such as an entry table, classroom counter, or mantel. Measure its width and check whether an outlet is available; battery-powered lighting avoids cords across walkways. Pick two or three colors, such as black, lime green, and purple, and repeat them across labels, cloth, and signs. Plan a clear space for guests to pass, and keep all decorations away from heaters, stovetops, and other hot surfaces.
Decide whether the display will be purely decorative or handled by guests. For a hands-on event, use sturdy plastic containers instead of glass and attach labels securely. Do not put craft liquids in drink bottles without clear markings, and never leave a decoration where someone could mistake it for food or a beverage.
Step-by-Step Instructions
Step 1: Clear and cover the display area
Remove everyday items from the chosen surface and wipe it clean. Cover the area with a dark cloth, paper, or plastic table covering. Place a sheet of scrap paper nearby for painting and gluing, and set a small waste container within reach.
Leave enough room at the front for a sign or a few small props. Keep the rear edge available for taller items so they do not block the view of shorter decorations.
Tip: Use a washable covering if you plan to use paint or colored water. Keep the display surface dry, especially if you are using battery-powered lights.
Check: The work area is clear, covered, and wide enough for a backdrop, several props, and a visible sign.
Step 2: Make a laboratory backdrop
Cut dark paper or fabric to fit the wall or rear of the display. Tape it in place, then add simple details such as a hand-drawn grid, molecule shapes, stars, or a large “Monster Lab” sign. Use thick lettering so the title can be read from the room entrance.
Attach paper details with removable tape if you are decorating a painted wall. Keep the backdrop flat and away from outlets, heaters, and lamps that become warm.
Tip: Repeat the same two or three colors you chose during planning. A limited palette helps the props look like one display.
Check: The backdrop is secure, the title is readable, and the wall behind the decorations is covered without blocking switches or outlets.
Step 3: Prepare labeled specimen jars
Wash and dry three to five clear jars or plastic containers. Add a small amount of water tinted with food coloring, or fill each container with dry items such as cotton batting, plastic insects, or paper shapes. Leave headspace and close each lid firmly.
Write a playful specimen name and number on a paper label, such as “Moth Sample 04” or “Meteor Dust.” Tape the label around the container where it can be read from the front. If you use colored water, mark the container “Decoration—Do Not Drink.”
Tip: Skip water if children may handle the jars or if a container could tip. Dry paper shapes and plastic props are easier to clean up.
Check: Each container is closed, stable, clearly marked, and visibly decorative rather than drinkable.
Step 4: Create a bubbling-looking beaker display
Arrange clear plastic cups or bottles behind the specimen jars. Add crumpled green or purple tissue paper, cotton batting, or curled paper strips to suggest foam and vapor. Keep the materials dry; the visual effect does not require a chemical reaction.
Place each container on a small tray or a piece of cardboard. If you add a battery-powered light, set it outside the container or use a light made for enclosed decorations. Do not place electrical lights in water.
Tip: Layer two shades of paper in a container to add depth. Avoid loose glitter if the area will be used by children or pets.
Check: The props look layered and colorful, and no liquid or loose material can spill into an electrical light.
Step 5: Add science labels and warning signs
Make two or three signs with short, readable wording, such as “Caution: Alien Specimens” or “Authorized Researchers Only.” Add a simple symbol—a flask, atom, eyeball, or skull—beside each heading.
Place the largest sign at the back or center of the display. Put smaller labels directly beside the props they describe, leaving space between items so the text is not hidden.
Tip: Use large lettering and strong contrast. A sign that looks clever up close can be hard to read across a room if the letters are too small.
Check: The main sign can be read from the entrance, and the smaller labels match the containers beside them.
Step 6: Add safe glowing accents
Place LED tea lights behind translucent paper, inside a lantern made for LED lights, or between the props. Switch each light on before arranging it, then hide the battery compartment behind a jar or a piece of backdrop.
Use only battery-powered lights around paper, cotton, and fabric. Route any string-light wire along the back of the table and secure it so it cannot snag a sleeve or hang into a walkway.
Tip: Test the lighting in the room where the display will sit. A bright overhead light may make a subtle glow hard to see, so move the LEDs closer to the front if needed.
Check: The accents glow without exposed flames, wet components, visible trip hazards, or blocked access to the battery switches.
Step 7: Arrange the display from back to front
Set the tallest items at the back, medium jars in the middle, and small props or a sign near the front. Group related objects together, such as specimens on one side and beakers on the other. Turn every label toward the room.
Step back and check the arrangement from the doorway. Move any item that hides a sign, crowds the edge, or makes the display feel unstable. Keep a clear route past the table and place breakable or small objects beyond easy reach.
Tip: Use a sturdy box under a cloth to raise a few items at the back. Check that the raised items do not wobble before leaving them in place.
Check: The main sign and key props are visible from the room entrance, and nothing hangs over the edge or blocks a path.
Step 8: Inspect and tidy the finished setup
Press each label and backdrop attachment lightly to check that it holds. Confirm every jar lid is closed and every battery compartment is shut. Remove scraps, tape ends, and loose decorations from the floor and table.
Turn on the lights and view the display with the room lighting set as it will be during the event. Replace a dim battery, adjust any hidden sign, and move anything that could be mistaken for a snack or drink.
Tip: If guests will touch the props, check the setup again after the first group arrives and replace any loosened label or tipped container.
Check: The display is tidy, stable, readable, illuminated as planned, and separated from food, heat, and walking routes.
Common Mistakes to Avoid
- Using real flames near paper, fabric, or cotton props. — Choose LED tea lights or battery-powered string lights for every part of the display.
- Filling decorative containers with liquids that look like drinks. — Use dry props when possible. Label any colored liquid “Decoration—Do Not Drink,” close the lid, and keep it away from food.
- Making the labels too small or placing them behind other items. — Use short wording, large lettering, and a final doorway check before the display opens.
- Crowding the table edge or running light wires across a walkway. — Keep props inside the surface edges and route wires behind the display, secured in place.
Troubleshooting
Problem: A jar or bottle keeps tipping over.
Solution: Use a wider plastic container, remove some of its contents, or secure it to a tray with removable putty. Move it away from the table edge.
Problem: The colored liquid looks cloudy or leaks.
Solution: Empty the container, wash and dry it, then use less food coloring and a sound lid. If guests may handle it, replace the liquid with dry paper or plastic props.
Problem: The lights are difficult to see.
Solution: Move the LED closer to the front of the display, reduce nearby room lighting if appropriate, or use a fresh battery. Keep lights out of liquid.
Problem: The backdrop or labels peel off.
Solution: Use tape suited to the surface, press it firmly onto a clean, dry area, and reduce the size or weight of paper pieces. Test removable tape in an inconspicuous spot first.
What Success Looks Like
The completed display has a readable science-themed sign, several clearly labeled props, a coordinated backdrop, and visible accents from the room entrance. Jars are stable and closed, lights are battery-powered, and the setup has no exposed flame, spills, loose floor clutter, or blocked walking route.
Next Steps
Before guests arrive, switch on the lights and make one final walk around the display to check sight lines and walking space. During the event, replace any prop that becomes wet or unstable. Afterward, switch off and store the lights, recycle clean paper and cardboard, wash reusable containers, and discard any material that is damaged or difficult to clean.
Frequently Asked Questions
Can I make this display without glass jars?
Yes. Use clear plastic food containers, plastic bottles with labels removed, or disposable cups set inside a tray. Plastic is a good choice when children may handle the props.
How can I make glowing decorations without a black light?
Place battery-powered LED lights behind translucent paper or beside clear containers. Choose bright colors for the paper and test the arrangement in the room before guests arrive.
What can I use instead of colored water?
Use crumpled tissue paper, plastic insects, cotton batting, paper “specimens,” or colored beads sealed inside a sturdy container. Dry materials reduce spills and cleanup.
Can guests handle the specimen jars?
Allow handling only when containers are made from sturdy plastic, have secure lids, and contain non-toxic decorative materials. Keep small pieces away from young children, and supervise any hands-on activity.
How early should I set up the decorations?
Allow 2-3 hours for the steps, with extra time if paint or glue needs to dry. If you prepare signs and labels beforehand, the final arrangement usually takes less time.
Halloween Picks
halloween
As an affiliate, we earn on qualifying purchases.